Knit version
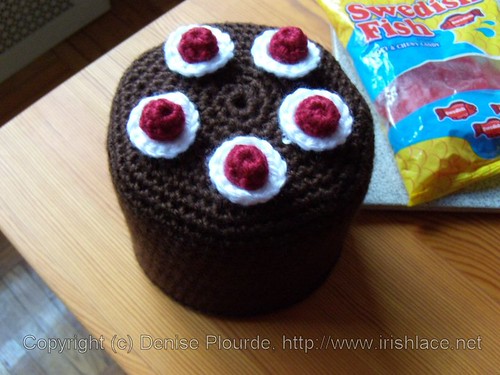
The cake is a lie. But the toilet paper cover isn't.
Dimensions: To fit your roll of toilet paper. The sample measures 4.75" in diameter by 4.75" high (12cm by 12cm)
Supplies:
Hook: To give a fabric you like with the yarn you're using. The sample was made with a US H8/5mm hook.Yarn needle: To weave in ends
Buttons (optional): One for each cherry. (Sample used 5 1/2" two-hole buttons.) They aren't strictly necessary, but I found it easier to attach the cherries and frosting by anchoring them on a button.
Stitch markers: safety pins, bobby pins, scraps of yarn - at least one, possibly more as needed (If you buy official stitch markers, be sure to get split rings or safety pin types. Unbroken ring markers are good for knitting, but not for crochet.)
Toilet paper roll: Yep. This is more couture toilet roll fashion. Custom made to fit that particular roll.
Yarn: Brown, white, and red.
Sample was made with:
Red Heart Soft, Color 4344, Chocolate: 52g/95yds
Red Heart Soft, Color 4600, White: 5g/10yds
Red Heart Soft, Color 4608, Wine: 5g/10yds
If your roll of toilet paper is larger, you may need more yarn.
Pattern:
Abbreviations:
ch: chain
sl st: slip stitch: used for joining rounds, also for getting to the next chain space when working in rounds
sc: Single crochet - US terms. Double crochet - UK, Australia, and probably a bunch of other places.
Please note: This pattern uses US crochet terms. If it says sc, it's a USsc/UKdc.
Chocolate cake toilet paper roll cover
The basic idea of making a circle is that you increase the number of stitches in each round by the number of stitches that you had in the first round. So if you have 7 USsc in the first round, the second round will have 14, and the third round will have 21, and the fourth round will have 28 and so on. You do this by working 1 stitch into a certain number of sc from the previous round, then working 2 sc into the next stitch. So if you have finished the 5th round, you have 35 stitches, and you want to increase to 42. You would work four sc in a row, then work 2 sc into the next sc, then four more sc, then another increase.
Use common sense, though. Put the circle down occasionally. If it is cupping, you need to work more increases. If it is ruffling, you need to work fewer.
And do NOT be afraid to frog. It's just yarn.
Top:
With brown, chain 4 stitches, join in a ring.
Round 1: Chain 1 (counts as first sc), work 7 sc into ring. Mark last sc made with a stitch marker (=7sc)
Round 2: 2 sc into first sc of previous round, 2 sc into each sc around, move stitch marker to new last sc (=14 sc)
Round 3: *2 sc into next sc, sc into next sc, repeat from * around, move stitch marker to new last sc (=21 sc)
Round 4: *2 sc into next sc, sc into each of next 2 sc, repeat from * around, move stitch marker to new last sc (=28 sc)
Round 5: *2 sc into next sc, sc into each of next 3 sc, repeat from * around, move stitch marker to new last sc (=35 sc)
Rounds 6-?: repeat round 5, increasing the number of plain sc ("sc into each of next __ sc") by one stitch each round, until the circle is just slightly larger than the roll.
Sides:
Work even (one sc into each stitch) until piece is long enough to cover the roll.
Break yarn. Weave in ends.
Frosting (make 5)
With white, chain 4 stitches, join in a ring.Round 1: Chain 1 (counts as first sc), work 7 sc into ring. Mark last sc made with a stitch marker (=7sc)
Round 2: 2 sc into first sc of previous round, 2 sc into each sc around, move stitch marker to new last sc (=14 sc)
Break yarn. Weave in ends.
Cherries (make 5)
With red, chain 4 stitches, join in a ring.Round 1: Chain 1 (counts as first sc), work 7 sc into ring. Mark last sc made with a stitch marker (=7sc)
Round 2: sc into each sc of previous round
Round 3: sc into each sc of previous round
Break yarn, leaving a fairly long tail. Weave tail through the back loops of the last round, and pull tight, catching the starting tail within the sphere. (The starting tail is the stuffing.) Optional: catch tail under one stitch on opposite side of purse string closure, so the tail forms a loop and the cherry looks something like this from a side view:

Assembly
Block pieces as desired. Sew cherries and frosting to cover. If you've made the optional tail-and-loop for the cherries, you can pull those through the frosting circles, then pull them through the cake, then pull them through the holes of buttons (loop through one hole, single strand through the other), and tie them in a square knot. If you prefer another way of anchoring bobbles, please use that method.

Admire.
So there you have it. A toilet paper cover that looks sweet. Even if it is a lie.